To publish an app on Google Play you create a Play Console developer account (a one-time US$25 fee), set up your app and its policy forms, add a store listing, upload a signed Android App Bundle, and run the required tests before you release to production. If your developer account is a new personal account, Google also requires a closed test with at least 12 testers before you can apply for production access. This guide walks through each step in order, with the limits, file specs and common rejection reasons checked against Google's own documentation.
Our team has taken several Android apps through this process, and the steps that cause delays are almost always the same ones: the policy forms, the testing requirement and mismatches between the app and its declarations. The guide is built around those.
Before you start: what you need
Gather these first. It saves hours of stop-and-start.
- A Google Account for the developer profile and a credit or debit card (prepaid cards are not accepted).
- A government ID under your legal name for a personal account, or an organisation's details for an organisation account.
- A finished app bundle (.aab), signed and targeting the required API level.
- A privacy policy URL that is publicly reachable. Our privacy policy generator can draft one, plus the deletion page.
- Store assets: an app icon, a feature graphic and screenshots, and the text for your listing. Our listing optimizer checks the text and the asset sizes.
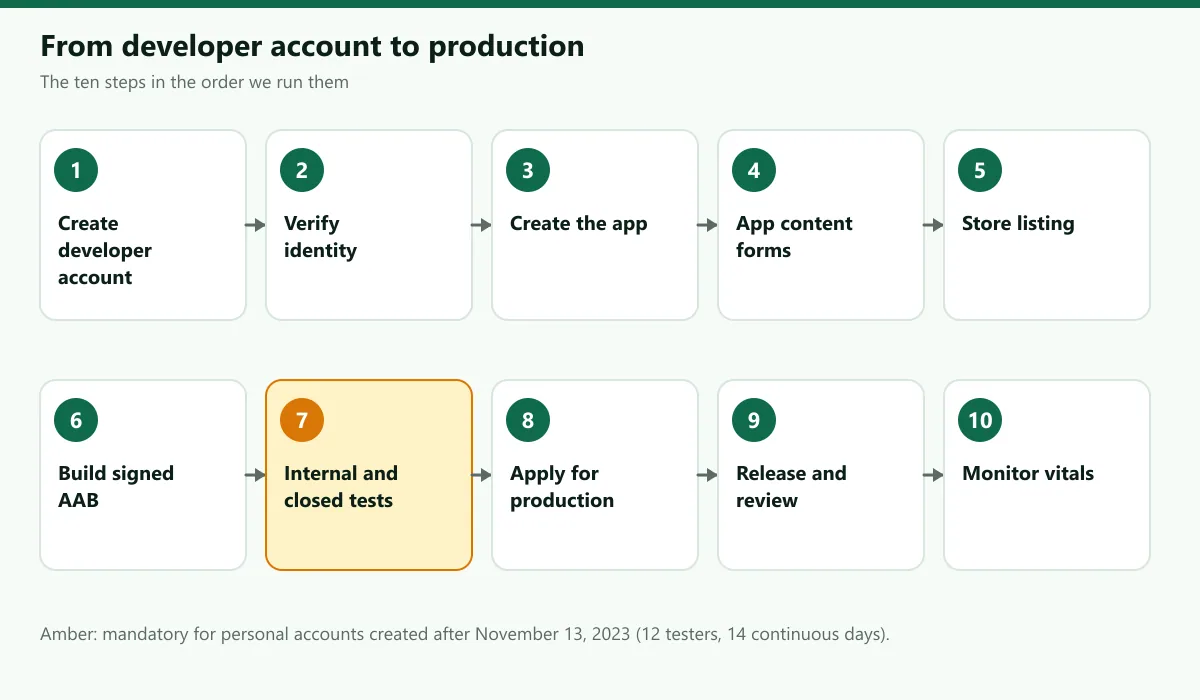
Step 1: Create your Google Play developer account
Open Play Console and sign up with your Google Account. According to the official guide, you must be at least 18, accept the Developer Distribution Agreement, and pay a one-time US$25 registration fee by credit or debit card. You then choose between two account types:
- Personal. For individuals. Subject to extra testing requirements (see Step 7).
- Organisation. For companies and other organisations. Google asks for details including a D-U-N-S number, the organisation's name, address, phone number and website. Applying for a D-U-N-S number through Dun & Bradstreet is free, so be wary of third parties that charge for it.
Identity verification
Google verifies your identity before you can publish. For a personal account you may be asked for a valid government ID and a credit card, both under your legal name. Contact email and phone details are confirmed with one-time passwords and should stay active for as long as the account does. Personal accounts also need to confirm access to an Android device through the Play Console mobile app. If the information is found to be invalid, the registration fee is not refunded, so enter your details exactly as they appear on your documents.
Step 2: Create your app in Play Console
From Home, choose Create app. You provide:
- A default language and the app name as you want it to appear on Google Play (you can change it later).
- Whether it is an app or a game, and whether it is free or paid.
- A contact email address that users can use to reach you.
- The declarations: the Developer Program Policies and US export laws, and the Play App Signing terms.
Choose your package name carefully. Google states that package names are unique and permanent, and that they cannot be deleted or reused later.
Step 3: Complete the app content and policy forms
After you create the app, the dashboard guides you through the setup tasks. This is the stage where most first-time rejections begin, so go slowly.
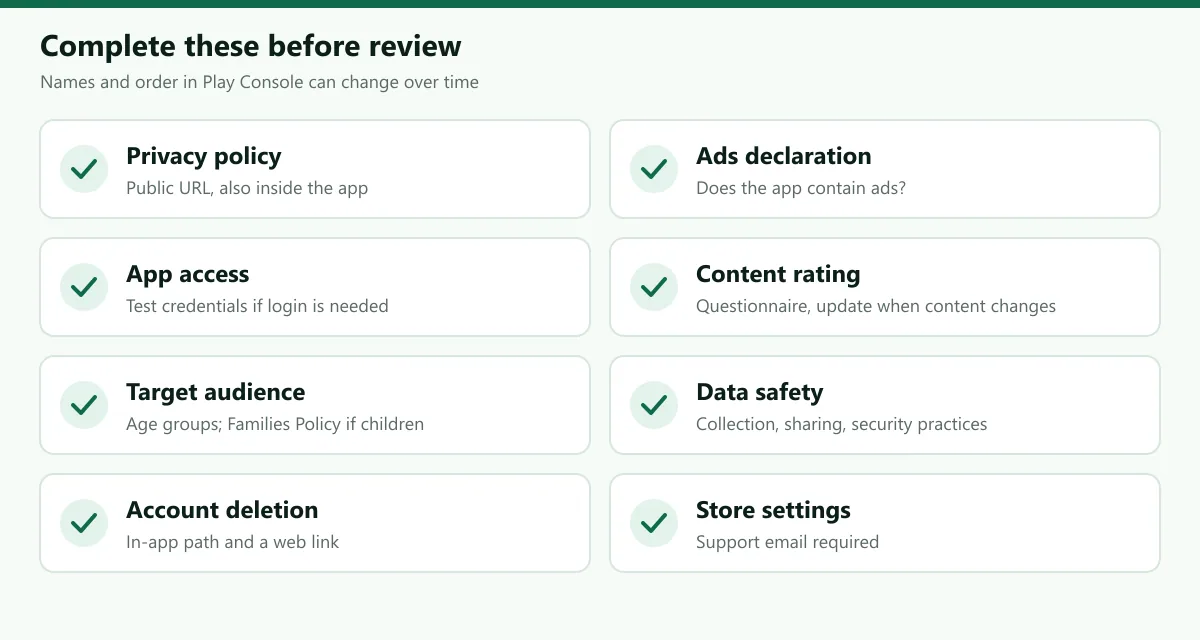
- Privacy policy. A link to a public web page. It is required to complete the Data safety form, and it must also be available inside your app. Details are in our privacy policy requirements guide.
- Ads declaration. Say whether your app contains ads.
- App access. If parts of your app need a login, give reviewers working instructions or test credentials so they can see the whole app.
- Content rating. You answer a questionnaire, and the rating authorities assign ratings from your answers. Be accurate, and update your answers whenever your content or features change.
- Target audience and content. You choose the age groups your app targets. If any selected group includes children, the app must comply with Google Play's Families Policy, including using only Families Self-Certified Ads SDKs for ads.
- Data safety. A form describing what data your app collects, shares and how it protects it. Even an app that collects no user data must complete it and link a privacy policy.
- Account deletion. If users can create an account in your app, you must offer an in-app way to request deletion and a web link where users can request it.
Step 4: Build your store listing
The main store listing is what users see. The limits come from Google's own documentation.
| Field | Requirement |
|---|---|
| App name | 30 characters or fewer |
| Short description | 80 characters or fewer |
| Full description | 4,000 characters or fewer |
| App icon | 512 × 512 px, 32-bit PNG with alpha, up to 1,024 KB |
| Feature graphic | 1,024 × 500 px, JPEG or 24-bit PNG with no alpha |
| Screenshots | Up to 8 per device type (phone, tablet, and so on) |
| Contact | A support email is required; a website is recommended |
Two rules catch people out. First, repetitive or irrelevant keywords in the name, description or promotional text can lead to suspension. Second, the metadata policy says not to use emojis, emoticons or repeated special characters in the title, icon or developer name, and to avoid ALL CAPS unless it is part of your brand. Images or text claiming rankings or awards, such as "#1" or "Best of Play", and price or promotion claims are not allowed in your graphics either. For how to write the listing itself, see our Google Play ASO guide.
Step 5: Build and sign your app bundle
Google Play uses Android App Bundles (.aab). You build, sign and upload one bundle, and Google Play generates optimised APKs for each device configuration.
- Target API level. From August 31, 2026, new apps and app updates must target Android 16 (API level 36) or higher, except Wear OS and Android Automotive OS apps, which must target API level 35 or higher, and Android TV and XR apps, which must target API level 34 or higher. You can request an extension to November 1, 2026.
- Version code. Every upload needs a higher
versionCode. The maximum value Play Console accepts is 2,100,000,000. - Size. The maximum compressed download size per device generated from a bundle is 200 MB.
- Play App Signing. You sign your bundle with an upload key; Google signs the APKs delivered to users with the app signing key. If you lose an upload key, Google can reset it. A custom app signing key must be RSA 2048-bit or higher, and Google recommends using different keys for upload and app signing.
Step 6: Create a release and use the testing tracks
Releases go out on a track.
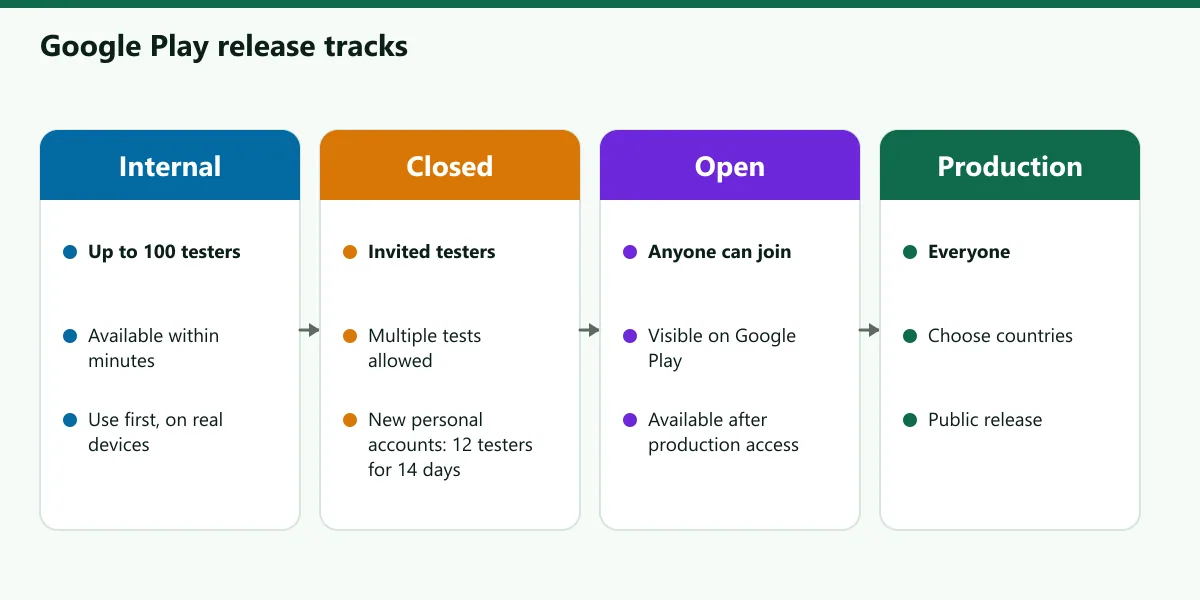
- Internal testing. Up to 100 testers. Google says a new bundle becomes available to internal testers within minutes. Use it first, to check the install and sign-in flow on real devices.
- Closed testing. A targeted group you invite. You can run multiple closed tests at once.
- Open testing. Your test version is visible on Google Play and anyone can join. Google says it becomes available after you gain production access.
- Production. The public release.
Upload your bundle, add a release name and release notes, and roll it out to the track. Test links can take several hours to become available after the first publication.
Step 7: The closed testing requirement for new personal accounts
If your personal developer account was created after November 13, 2023, Google requires a closed test with at least 12 testers who have been opted in continuously for at least 14 days before you can apply for production access. Production and pre-registration stay disabled until you meet it.
Practical points from Google's guidance:
- Recruit testers from your network and from communities where your users are. Tell them they must stay opted in for 14 days in a row.
- A tester who opts out and back in must be opted in for 14 consecutive days to count.
- Keep a record of feedback. When you apply for production access you answer questions about your closed test, your app and your readiness.
- Google says production access review usually takes seven days or less, but can take longer. If you have fewer than 12 testers or too little engagement, you may be asked to keep testing.
The requirement is written for personal accounts, so check Play Console for what applies to your account type.
Step 8: Release to production and wait for review
When you are approved, create a production release, choose the countries where the app will be available, and submit it. Google lets you use standard or managed publishing, which controls when approved changes go live.
On review time, Google's publishing documentation notes that for certain developer accounts it takes more time to review an app thoroughly, which can mean review times of up to seven days or longer in exceptional cases. Plan for several days, and avoid setting a launch date that depends on same-day approval.
You can see your app's status under its name in Play Console. A first-time app that is rejected shows as "Draft", and you can fix the issue and resubmit or appeal.
Common rejection reasons and how to fix them
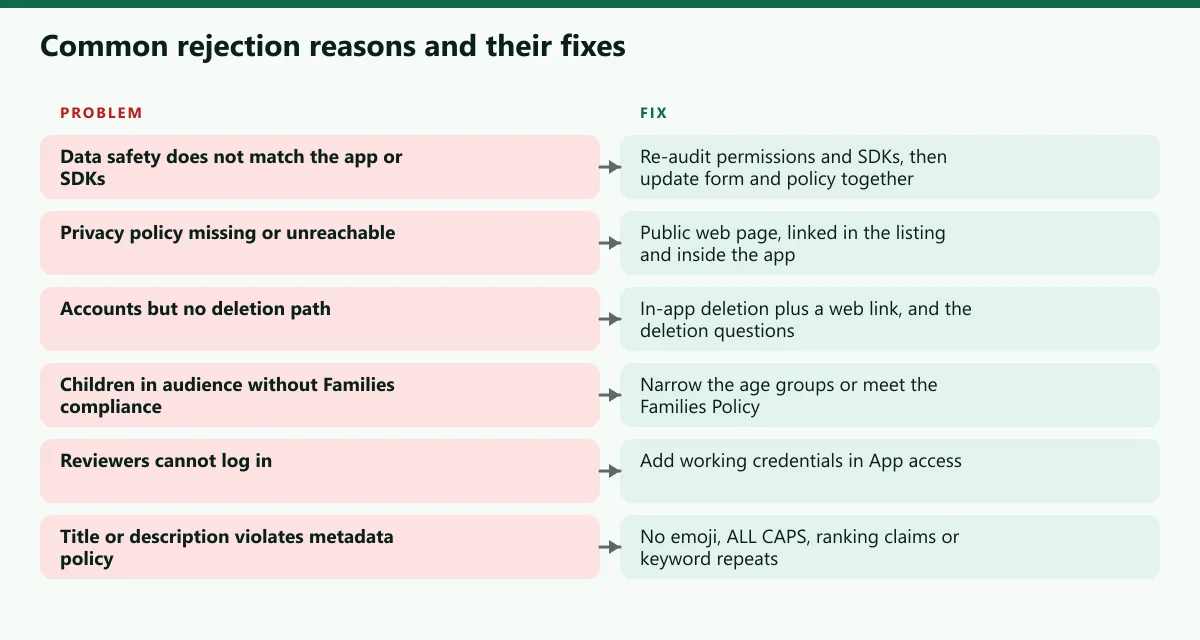
| Problem | Fix |
|---|---|
| Data safety form does not match what the app or its SDKs do | Re-audit permissions and every SDK, then update the form and your policy together |
| Missing or unreachable privacy policy | Host a public page (not a PDF behind a login) and link it in the listing and in the app |
| No account deletion path although accounts exist | Add an in-app deletion option and a web link, and complete the deletion questions |
| Target audience includes children but the app does not meet Families requirements | Narrow the age selection, or bring the app and its ad SDKs into compliance |
| Reviewers cannot get past a login | Provide working credentials in the app access section |
| Metadata violations: ALL CAPS, emoji, repeated keywords, ranking claims | Rewrite the title, description and graphics in plain language |
| Targeting an out-of-date API level | Update targetSdk and test on the new version |
Google reminds developers that review is not a troubleshooting step. Check your app against the policies before you submit, since submitting a non-compliant app and hoping reviewers find the issue leads to rejections and longer appeals.
After launch: keep the app healthy
Publishing is the start. Google tracks core quality metrics in Android vitals, and says that apps exceeding the bad behaviour thresholds are likely to be less discoverable. The user-perceived crash rate threshold is 1.09 percent of daily active users overall, and the ANR rate threshold is 0.47 percent overall, with 8 percent for any single device model. Watch them after every release, and reply to reviews. If you want help scoping or building the app itself, see our Android development service, and our launch checklist is a good final pass before you submit.
Frequently asked questions
Sources
- Google Play Console Help, Get started with Play Console
- Google Play Console Help, Create and set up your app
- Google Play Console Help, App testing requirements for new personal developer accounts
- Google Play Console Help, Set up an open, closed, or internal test
- Google Play Console Help, Publish your app
- Google Play Console Help, Target API level requirements for Google Play apps
- Google Play Console Help, Add preview assets to showcase your app
- Google Play Console Help, Metadata policy
- Google Play Console Help, Use Play App Signing
- Google Play Console Help, Required information to create a developer account
- Android Developers, Android developer verification

Written by
Hamza Fazal
CTO, DEESU
Muhammad Hamza Fazal is the CTO of DEESU. An Android and full-stack web developer and digital marketer based in Islamabad, he builds the apps and platforms behind DEESU's engineering work.
More from HamzaFree tools for this topic
Need help with this?