
Few topics in modern web engineering have generated more heated debate, architectural confusion, and developer frustration than the caching mechanisms of the Next.js App Router. When Next.js initially launched Server Components, it famously embraced aggressive, multi-layered caching by default. Developers who simply wanted to query an API found their applications stubbornly serving stale data across server restarts, edge deployments, and user sessions.
With the stable releases of Next.js 15 and 16, the Next.js engineering team listened to community feedback and executed a major architectural pivot: caching is now opt-in rather than opt-out by default. Standard fetch requests, GET Route Handlers, and client page navigations no longer cache stale data automatically.
However, building enterprise-grade, high-traffic web applications still requires aggressive caching. If your database or external headless CMS receives 10,000 requests per minute without caching, your infrastructure bills will skyrocket and response times will degrade. To build ultra-fast applications without serving stale data, you must master the 4-tier caching model of modern Next.js.
In this comprehensive architectural guide, we dissect each caching tier, explain the exact mechanisms of revalidateTag and unstable_cache, and provide production patterns for seamless Server Action mutations.
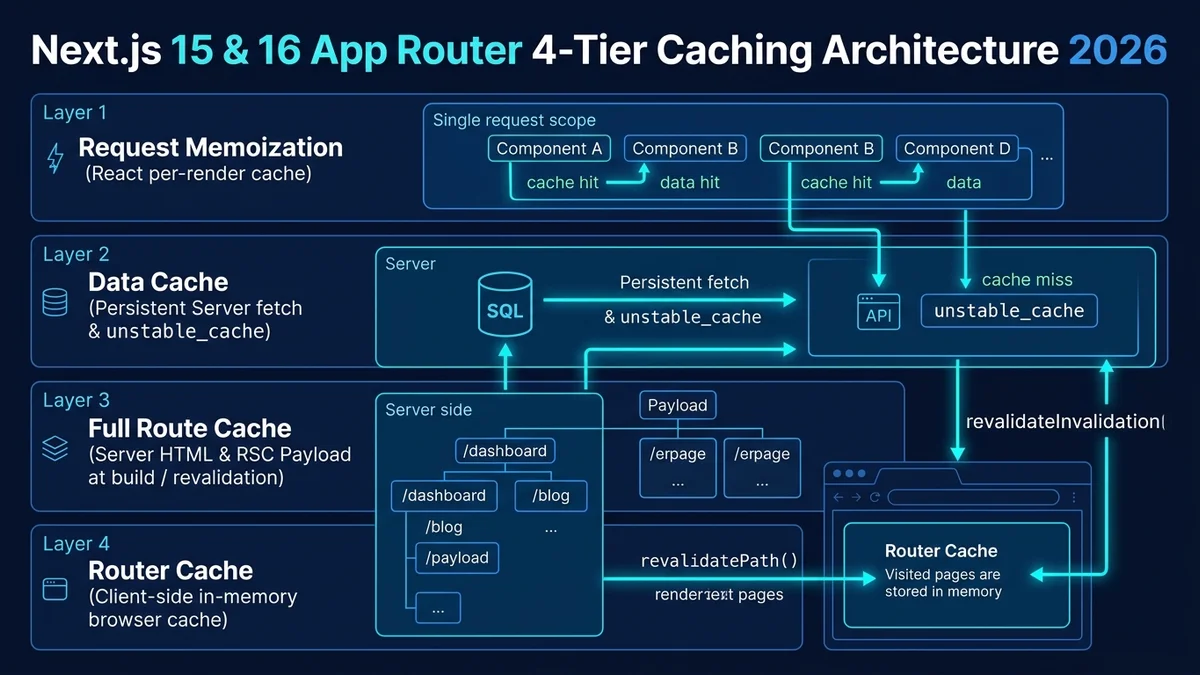
1. The 4 Distinct Caching Layers in Next.js
To debug and control caching effectively, you must understand where data lives and how long it survives. Next.js coordinates four separate caches between the server and the browser:
| Caching Layer | Where It Lives | Purpose & Lifecycle | How to Invalidate |
|---|---|---|---|
| 1. Request Memoization | Server Memory (React Fiber) | Deduplicates identical fetch() calls within a single render pass. | Automatic (dies when request rendering finishes). |
| 2. Data Cache | Persistent Server Storage (Disk/Redis) | Stores fetched data across user sessions and server deployments. | revalidateTag(), revalidatePath(), or time-based TTL. |
| 3. Full Route Cache | Server Storage (Static HTML & RSC) | Stores pre-rendered static routes generated at build time. | Triggered automatically when Data Cache entries revalidate. |
| 4. Router Cache | Client Browser Memory | Stores visited RSC route segments during the user's active browser session. | router.refresh(), Server Actions with revalidation, or page reload. |
2. The Big Shift: Default Fetch Behavior in Modern Next.js
In legacy Next.js 13 and 14, calling fetch('https://api.example.com/data') defaulted to cache: 'force-cache'. If you forgot to pass { cache: 'no-store' }, your production app cached that API response permanently.
In Next.js 15 and 16, the default configuration is reversed. Calling fetch() defaults strictly to cache: 'no-store'. To cache an API call, you must now explicitly opt in using one of two methods:
// Method A: Permanent Data Cache with on-demand Tag Invalidation
const res = await fetch("https://api.company.com/products", {
  cache: "force-cache",
  next: { tags: ["products"] }, // Tag for on-demand invalidation!
});

// Method B: Time-Based Stale-While-Revalidate (TTL: 1 Hour)
const analytics = await fetch("https://api.company.com/metrics", {
  next: { revalidate: 3600 }, // Automatically refreshes after 3600 seconds
});
3. Caching Raw Database Queries with `unstable_cache`
Many modern full-stack architectures don't fetch data through HTTP REST endpoints; they query PostgreSQL databases directly using ORMs like Prisma, Drizzle, or Kysely. Because database connections bypass the native fetch API, they do not automatically enter the Next.js Data Cache.
To give database queries the same caching performance and on-demand invalidation as HTTP requests, Next.js provides unstable_cache. Here is the production pattern:
import { unstable_cache } from "next/cache";
import { db } from "@/lib/db";

// Wrap database query with persistent caching
export const getCachedUserProfile = unstable_cache(
  async (userId: string) => {
    // Heavy relational SQL query
    return await db.user.findUnique({
      where: { id: userId },
      include: { subscriptions: true, teamMembers: true },
    });
  },
  ["user-profile-cache-key"], // Unique cache key parts
  {
    tags: ["users", `user-${userId}`], // Cache tags for pinpoint invalidation
    revalidate: 86400, // Optional 24-hour TTL fallback
  }
);
4. Tag Invalidation (`revalidateTag`) vs. Path Invalidation (`revalidatePath`)
When a user mutates data (such as updating their profile name or publishing a blog post), you must purge the cache. Many developers instinctively call revalidatePath('/dashboard'). However, revalidatePath has severe architectural drawbacks:
- `revalidatePath` is blunt and expensive: It purges every single cached component and query across that entire URL path, even if only one small widget changed.
- `revalidatePath` does not cascade: If the user's updated name appears on
/dashboard,/settings,/team, and the public header, you must manually list every single URL path in your application. - `revalidateTag` is surgical and universal: By assigning semantic tags (e.g.
user-991orteam-alpha) to your cached queries, callingrevalidateTag('user-991')purges that entity's data instantly everywhere across all pages, layouts, and route handlers in O(1) time.
5. The Zero-Stale Server Action Pattern
One of the most powerful features of Server Actions in modern Next.js is that cache invalidation and client-side UI synchronization happen in a single atomic HTTP request. You do not need to call router.refresh() manually in the client after a Server Action executes.
"use server";

import { revalidateTag } from "next/cache";
import { db } from "@/lib/db";

export async function updateOrganizationPlan(orgId: string, newPlan: string) {
  // 1. Execute database mutation
  await db.organization.update({
    where: { id: orgId },
    data: { plan: newPlan },
  });

  // 2. Invalidate the specific organization tag
  // Next.js immediately clears the server Data Cache AND updates
  // the client Router Cache in the response stream!
  revalidateTag(`org-${orgId}`);

  return { success: true };
}
6. Production Next.js Caching Architecture Checklist
Before deploying a Next.js application to production, verify these five architectural rules:
- Do not rely on implicit caching; explicitly declare
cache: 'force-cache'ornext: { revalidate: N }on endpoints that require caching. - Always attach granular tags (
next: { tags: ['entity-id'] }) to cached fetch requests andunstable_cachecalls. - Prefer
revalidateTag()overrevalidatePath()to achieve surgical O(1) cache purges without re-rendering unrelated route segments. - Never cache personalized user data in global Full Route caches; ensure routes with authenticated user sessions use dynamic Server Components.
- Verify that Server Actions execute
revalidateTag()inside server logic rather than forcing client-sidewindow.location.reload()hacks.
Frequently asked questions
no-store), giving developers explicit control over when and how to opt into caching.revalidateTag('tag-name') is invoked, Next.js marks all cached data associated with that tag as stale. The next incoming request triggers a fresh background fetch (Stale-While-Revalidate) and updates the cache without requiring a rebuild or redeployment.incrementalCacheHandlerPath in next.config.js to point the Data Cache to a shared Redis cluster, allowing multi-node server clusters to share a synchronized cache.revalidateTag() or revalidatePath() automatically clears this client cache.Sources

Written by
Hamza Fazal
Founder, DEESU
Muhammad Hamza Fazal is the Founder of DEESU. An Android and full-stack web developer and digital marketer based in Islamabad, he founded DEESU in May 2022 and leads its engineering operations, product strategy, and client software delivery.
More from HamzaNeed help with this?